Sponsors
Would you like to sponsor a challenge at Top 50 and have your store link shown here? If so, please contact admin! :)
Latest topics
Class Instructions here!! :) No chat!!
Page 1 of 1
 Class Instructions here!! :) No chat!!
If you would like a copy of tonights class to save/print, here is a PDF version: http://www.my2angels.net/UserFiles/File/step%20by%20step%20online%20top%2050%20class.pdf
Online Class for the Top 50Originally the layout was completed in the red and black but as requested I have made a
girls layout, blue & green layouts, so hopefully I have remember throughout the instructions to use the correct colours for you!
Take your pink pp/red pp/blue pp or greenpp and trim off barcode. Now cut 2cm off two
sides (not opposite sides). DO NOT throw these pieces away we will be using them on
your layout.
Your pattern paper should now measure 28.5cm x 28.5cm.
Run your knife or distress edger along the edges of your pp to give a distress look then
ink the edges. I inked the red layout black (I also purposely ripped it in some parts to give
a more rough edge for the boys layout) but left the pink layout white edges and no inking.
Of course the choice is totally up to you whether to ink or not its your layout.
Adhere your pattern paper to your pink/black cardstock leaving a 1cm border on all 4
sides I inked the pink cardstock with Opera Pink at this point. For the red and black layout you
may like to distress the edges of the black cardstockTake your 5cm strip of white cardstock and
cut it down to 27.5cm in length. For the boys layout I scrunched up approximately 5cm of each end then inked the edges black and wiped the black ink over the scrunched section For the girls layout I did not scrunch but I inked with Opera Pink the same way as the boys layout – wiping it over and inking the edges I only inked the tops and bottoms because the middle section will be covered by paper – save a little bit of your ink!
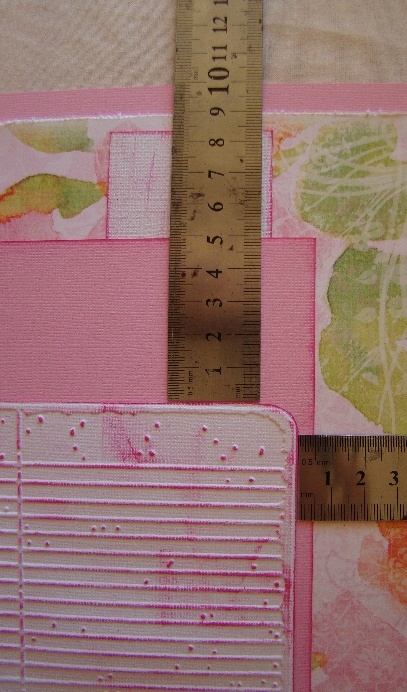
Adhere your white cardstock strip down 6.5cm from the right hand side and 1.5cm from the top (just leaving a little bit of pattern paper showing at the top and bottom)[/size]

Cut your red or blue cardstock down to 18cm x 15cm and distress edges with knife Cut your pink cardstock down to 18cm x 15cm and ink edges with opera pink Adhere to your layout from the right hand border 5cm and 5cm from the top.

Trim your embossed cardstock (Embossed with Tim Holtz Notebook Embossing Folder). Round the edges with your scissors or edge rounder punch.
Wipe ink over cardstock and ink darker around the edges.
Then adhere to layout at 5.5cm from right hand side and 10cm from top
Online Class for the Top 50Originally the layout was completed in the red and black but as requested I have made a
girls layout, blue & green layouts, so hopefully I have remember throughout the instructions to use the correct colours for you!
Take your pink pp/red pp/blue pp or greenpp and trim off barcode. Now cut 2cm off two
sides (not opposite sides). DO NOT throw these pieces away we will be using them on
your layout.
Your pattern paper should now measure 28.5cm x 28.5cm.
Run your knife or distress edger along the edges of your pp to give a distress look then
ink the edges. I inked the red layout black (I also purposely ripped it in some parts to give
a more rough edge for the boys layout) but left the pink layout white edges and no inking.
Of course the choice is totally up to you whether to ink or not its your layout.
Adhere your pattern paper to your pink/black cardstock leaving a 1cm border on all 4
sides I inked the pink cardstock with Opera Pink at this point. For the red and black layout you
may like to distress the edges of the black cardstockTake your 5cm strip of white cardstock and
cut it down to 27.5cm in length. For the boys layout I scrunched up approximately 5cm of each end then inked the edges black and wiped the black ink over the scrunched section For the girls layout I did not scrunch but I inked with Opera Pink the same way as the boys layout – wiping it over and inking the edges I only inked the tops and bottoms because the middle section will be covered by paper – save a little bit of your ink!
Adhere your white cardstock strip down 6.5cm from the right hand side and 1.5cm from the top (just leaving a little bit of pattern paper showing at the top and bottom)[/size]

Cut your red or blue cardstock down to 18cm x 15cm and distress edges with knife Cut your pink cardstock down to 18cm x 15cm and ink edges with opera pink Adhere to your layout from the right hand border 5cm and 5cm from the top.

Trim your embossed cardstock (Embossed with Tim Holtz Notebook Embossing Folder). Round the edges with your scissors or edge rounder punch.
Wipe ink over cardstock and ink darker around the edges.
Then adhere to layout at 5.5cm from right hand side and 10cm from top

 Re: Class Instructions here!! :) No chat!!
Photo Mount
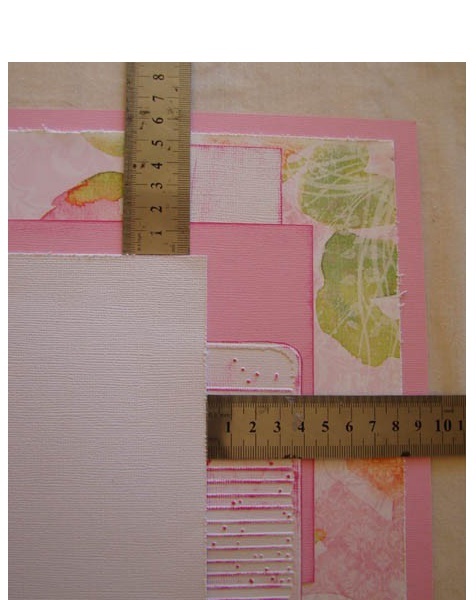
Cut your white or black cardstock down to15cm and then tear at 19.5cm. Use your ruler as a guide but do not tear up against the edge of the ruler as we do not want a straight line. You will end up with a piece measuring approx 19cm wide (the great thing about core dinations cardstock is the inner core colour shows when ripping as you will see more so on the black cardstock - its a grey core inner colour)
For the edges not torn, lightly distress the edges with your craft knife Adhere to layout 9.5cm from right hand side and 6.5cm from top.
This is your photo mount

The two thin strips you cut off the edges of your backing cardstock (at step 1) trim these down to 1cm strips by 28cm and ink the edges.
Attach 1 strip to just above the bottom of your photo mount the left side and 2cm away from your left side of your layouts.
Your second strip is .5cm below your other strip and against the edge of your left side of your layout.
Now for your ribbon, cut approximately 17cm and attach in between your two strips and 1cm from left side of page border – keeping in mind the wording so it may be less or slightly longer than 17cm
Your fence can now be adhered to just above the ribbon and approximately 2cm from the page border. Also adhere your grass on the fence and little girl charm or bike charm at the right hand edge of your fence. Your other piece of grass goes on your ribbon between the wording on the right hand side (see photo)

Cut your white or black cardstock down to15cm and then tear at 19.5cm. Use your ruler as a guide but do not tear up against the edge of the ruler as we do not want a straight line. You will end up with a piece measuring approx 19cm wide (the great thing about core dinations cardstock is the inner core colour shows when ripping as you will see more so on the black cardstock - its a grey core inner colour)
For the edges not torn, lightly distress the edges with your craft knife Adhere to layout 9.5cm from right hand side and 6.5cm from top.
This is your photo mount


The two thin strips you cut off the edges of your backing cardstock (at step 1) trim these down to 1cm strips by 28cm and ink the edges.
Attach 1 strip to just above the bottom of your photo mount the left side and 2cm away from your left side of your layouts.
Your second strip is .5cm below your other strip and against the edge of your left side of your layout.
Now for your ribbon, cut approximately 17cm and attach in between your two strips and 1cm from left side of page border – keeping in mind the wording so it may be less or slightly longer than 17cm
Your fence can now be adhered to just above the ribbon and approximately 2cm from the page border. Also adhere your grass on the fence and little girl charm or bike charm at the right hand edge of your fence. Your other piece of grass goes on your ribbon between the wording on the right hand side (see photo)

 Re: Class Instructions here!! :) No chat!!
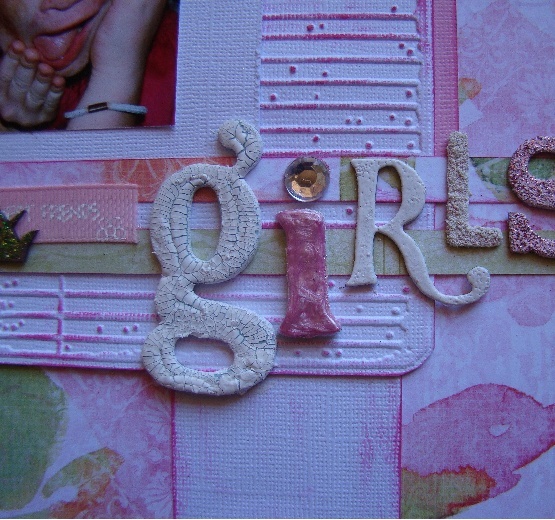
Now your title – using liquid glue stick each letter down slightly on the bottom right hand corner of your photo mount and covering some of your little strips (each one will be different as you all got different size letters) Probably best to place them on your layout first to ensure they fit. These are the ways I did my letters but it is up to you on the look you like. For the boys layout attach the boy charms inside or on the side of your “O” or which ever way you prefer.



 Re: Class Instructions here!! :) No chat!!
And lastly, is your top right hand piece of the black cardstock circle for the boys layouts and for the girls you have the rhinestone circles.
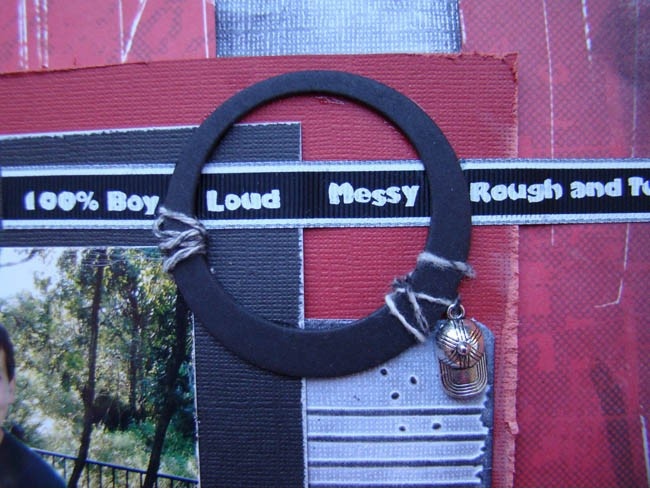
Take your boys/girls ribbon and lay it in position about 1cm down from the photo mount and against the right hand side of your layout.
Don't stick down just place your black cardstock circle or the smallest rhinestone circle over your ribbon – bearing in mind what words you want inside your circle
Are you with me so far?
Okay if happy with placement stick your ribbon to your layout and trimming the edges so it ends just before the edge of your right hand side of your layout.
Now boys layout, thread your boys cap charm through the string and wrap it around your circle – I also added a smaller bit on the other side of the circle as well (see picture)

Girls layout – Stick your smallest rhinestone circle down and hopefully I haven't forgotten to include the white thread in your kit!
Thread your friends charm and lift your circle up slightly and thread your thread underneath then tie a bow or knot which ever you prefer

And if I have done these instructions correctly …
Ta da
Finished!
Take your boys/girls ribbon and lay it in position about 1cm down from the photo mount and against the right hand side of your layout.
Don't stick down just place your black cardstock circle or the smallest rhinestone circle over your ribbon – bearing in mind what words you want inside your circle
Are you with me so far?
Okay if happy with placement stick your ribbon to your layout and trimming the edges so it ends just before the edge of your right hand side of your layout.
Now boys layout, thread your boys cap charm through the string and wrap it around your circle – I also added a smaller bit on the other side of the circle as well (see picture)


Girls layout – Stick your smallest rhinestone circle down and hopefully I haven't forgotten to include the white thread in your kit!
Thread your friends charm and lift your circle up slightly and thread your thread underneath then tie a bow or knot which ever you prefer

And if I have done these instructions correctly …
Ta da
Finished!
 Similar topics
» Class with Tracy chat area
» Chocolate Holder instructions
» Oct Class!!
» August class!!
» August Class!!
» Chocolate Holder instructions
» Oct Class!!
» August class!!
» August Class!!
Page 1 of 1
Permissions in this forum:
You cannot reply to topics in this forum


» Announcement... Please Read!!!
» Dec / Jan gallery!
» December / January monthly ch!
» Photo a day challenge
» Happy new year everyone ;)
» Nov CC WINNERS!!!!!
» EXTENSION!!!!!!!!!!!!!!!!!
» Nov Cyber Chat!!!
» Nov CC challenge 3 GALLERY