Sponsors
Would you like to sponsor a challenge at Top 50 and have your store link shown here? If so, please contact admin! :)
Latest topics
12 Weeks to Better Photos - Week One Challenge
5 posters
Page 1 of 1
 12 Weeks to Better Photos - Week One Challenge
12 Weeks to Better Photos - Week One Challenge: Exploring Aperture
So here’s the question we want to focus on this week:
Just how much of your photo do you want to be in focus?
The answer, of course, varies according to the situation. But in order to become more comfortable choosing your aperture, we invite you to partake in our weekly challenge.
First of all, we want you to operate your camera in Aperture Priority mode (often indicated with an “A” or an “Av” on your camera dial. Don’t worry about shutter speed as the camera will take care of that for you.) The goal of this challenge is to discover what different f/stop settings on your camera will produce for you and to become more comfortable with selecting these settings to fit your subject.
The easiest way to do this is to find a fixed subject such as a flower, a tree limb, etc. (If you are outside in daylight, set your ISO to around 400. We highly recommend you try this first challenge outdoors. If you are inside, you may have to set the ISO on your camera much higher like 1250 or even 1600. Your photos will be grainy, but you should still be able to tell what your aperture setting is doing to your photos.)
1. Set your f/stop (often accomplished by turning a dial, but check your manual if you’re not sure) to the lowest setting it will go. Compose your image and use either the manual focus or autofocus to focus on one particular spot of your subject (make sure to focus on this for both photos). Take your picture.
2. Move your aperture setting to the highest setting it will go to (most likely f/22). Compose and focus on the same element again. Take your picture.
Now bring these pictures into your image editing program and look at the differences in the composition.


Here is an example of 2 photos of the same subject taken with different aperture settings. Note that the one taken with a low aperture has less of the photo in focus, whilst the photo taken with a high aperture setting has more of the photo in focus.
If you are taking part in this course, we would love you to share your pictures with us, post them up for everyone to see! (Please post pics in the thread for that week.)
Happy snapping!!!
So here’s the question we want to focus on this week:
Just how much of your photo do you want to be in focus?
The answer, of course, varies according to the situation. But in order to become more comfortable choosing your aperture, we invite you to partake in our weekly challenge.
First of all, we want you to operate your camera in Aperture Priority mode (often indicated with an “A” or an “Av” on your camera dial. Don’t worry about shutter speed as the camera will take care of that for you.) The goal of this challenge is to discover what different f/stop settings on your camera will produce for you and to become more comfortable with selecting these settings to fit your subject.
The easiest way to do this is to find a fixed subject such as a flower, a tree limb, etc. (If you are outside in daylight, set your ISO to around 400. We highly recommend you try this first challenge outdoors. If you are inside, you may have to set the ISO on your camera much higher like 1250 or even 1600. Your photos will be grainy, but you should still be able to tell what your aperture setting is doing to your photos.)
1. Set your f/stop (often accomplished by turning a dial, but check your manual if you’re not sure) to the lowest setting it will go. Compose your image and use either the manual focus or autofocus to focus on one particular spot of your subject (make sure to focus on this for both photos). Take your picture.
2. Move your aperture setting to the highest setting it will go to (most likely f/22). Compose and focus on the same element again. Take your picture.
Now bring these pictures into your image editing program and look at the differences in the composition.
Here is an example of 2 photos of the same subject taken with different aperture settings. Note that the one taken with a low aperture has less of the photo in focus, whilst the photo taken with a high aperture setting has more of the photo in focus.
If you are taking part in this course, we would love you to share your pictures with us, post them up for everyone to see! (Please post pics in the thread for that week.)
Happy snapping!!!
Last edited by Soupie on Tue Feb 02, 2010 4:25 pm; edited 1 time in total
 Re: 12 Weeks to Better Photos - Week One Challenge
Sounds like lots of fun! 
I will put this on my list of fun things to do!
I will put this on my list of fun things to do!
 Re: 12 Weeks to Better Photos - Week One Challenge
Really looking forward to getting the most out of my camera and doing the challenges to achieve that.
____________
Kaylene
____________
Kaylene

kayjay- Posts : 217
Join date : 2009-04-18
Age : 71
Location : Mornington Peninsula, Victoria
 Re: 12 Weeks to Better Photos - Week One Challenge
Great shots Julie, thanks for posting these!  As I don't have a digi SLR (only a film one at this stage) I will be relying on you to post up pics from the challenges for everyone.
 Re: 12 Weeks to Better Photos - Week One Challenge
Soupie wrote:Great shots Julie, thanks for posting these!As I don't have a digi SLR (only a film one at this stage) I will be relying on you to post up pics from the challenges for everyone.
You can count on me Sue!

 Re: 12 Weeks to Better Photos - Week One Challenge
Fantastic challenge...there is certainly lots that I need to learn with my camera. Must give this a go!
 Re: 12 Weeks to Better Photos - Week One Challenge
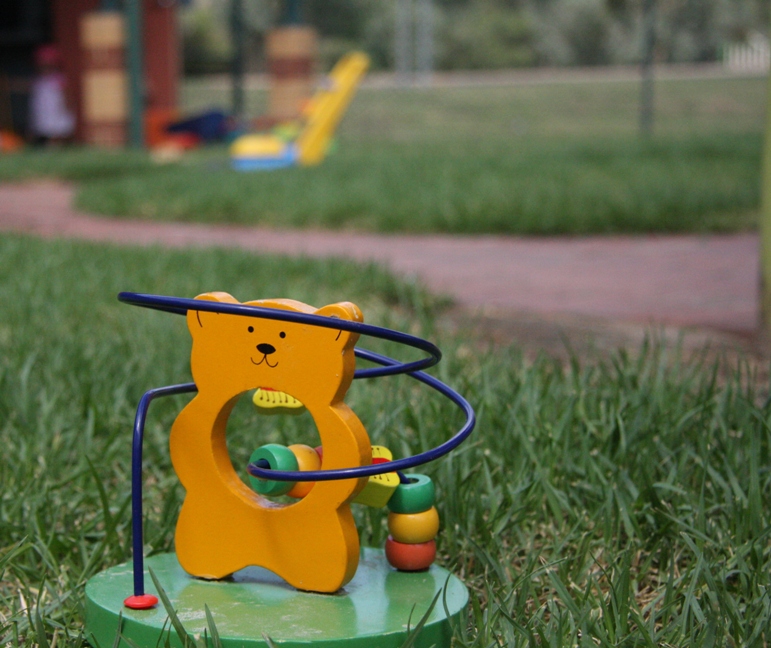
I finally gave this a go. I lay in the grass today at play group (I thought I might at least have some colour in the shot there) and this is what I came up with. I am really stoked that I did this on the manual setting and how easy it really was. Thanks. Also, I forgot the paper with the instructions, so my ISO was set at 1000 for both of them. This one was at about f5.3
 Well.
Well.
 Well.
Well. Re: 12 Weeks to Better Photos - Week One Challenge
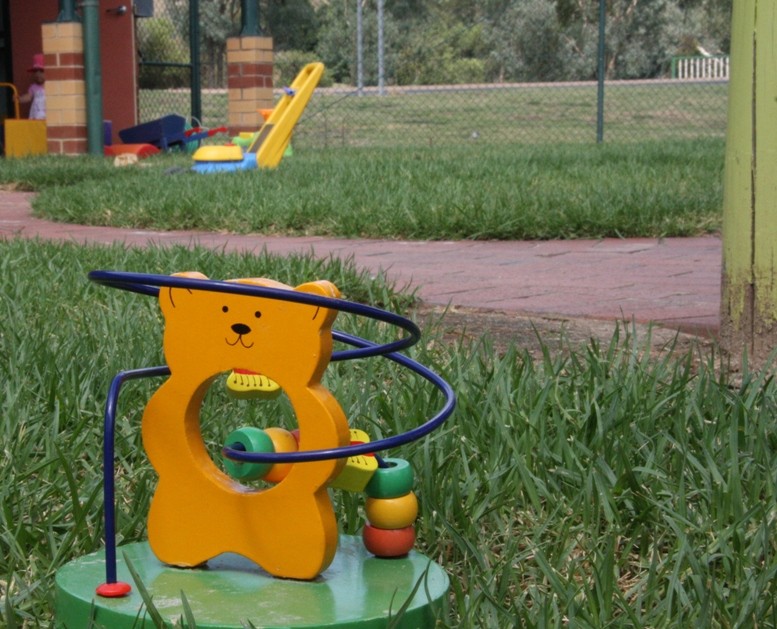
And this one was at about f29 (the highest I could go). Unlike Julie, I was unorganised and forgot to write my settings down. BTW -Can you see DD in the background? I didn't even know she was in the shot.


 Re: 12 Weeks to Better Photos - Week One Challenge
Love the colour, great place to take pics!
It was an interesting activity. I found myself 'playing' more this week
It was an interesting activity. I found myself 'playing' more this week

 Re: 12 Weeks to Better Photos - Week One Challenge
GREAT shots Anthea! 
After posting up all this photography stuff I am so tempted to get my old Pentax SLR out of the cupboard...
After posting up all this photography stuff I am so tempted to get my old Pentax SLR out of the cupboard...
 Similar topics
» 12 Weeks to Better Photos - Week Two Challenge
» 12 Weeks to Better Photos - Week Five Challenge
» 12 Weeks to Better Photos - Week Three Challenge
» 12 Weeks to Better Photos - Week Four Challenge
» 12 Weeks to Better Photos - Week Six Challenge
» 12 Weeks to Better Photos - Week Five Challenge
» 12 Weeks to Better Photos - Week Three Challenge
» 12 Weeks to Better Photos - Week Four Challenge
» 12 Weeks to Better Photos - Week Six Challenge
Page 1 of 1
Permissions in this forum:
You cannot reply to topics in this forum


» Announcement... Please Read!!!
» Dec / Jan gallery!
» December / January monthly ch!
» Photo a day challenge
» Happy new year everyone ;)
» Nov CC WINNERS!!!!!
» EXTENSION!!!!!!!!!!!!!!!!!
» Nov Cyber Chat!!!
» Nov CC challenge 3 GALLERY